

- Agents
- Atlassian Cloud
- Jira Integration
- AI Coding Assistant
- AI Developer Tools
- Bitbucket Integration
- Atlassian AI
- Confluence Integration
- AI in Software Development
- Atlassian Rovo
- Rovo Dev
- Atlassian
Using Rovo Dev Serve Mode in IDE
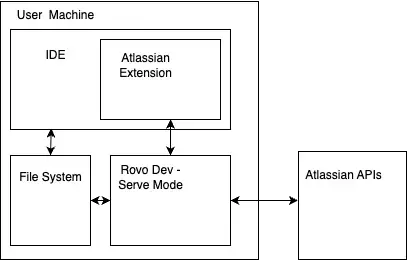
Install the Atlassian VS Code extension, also supported in Cursor and Windsurf, and it typically runs Rovo Dev in serve mode using your Atlassian email, API token, site URL and an experience ID. Your site must be entitled to Rovo Dev, otherwise it stays in a restricted state, and usage consumes credits up to a limit.

Atlassian has been expanding its AI-powered toolset for developers, and the latest highlight is Rovo Dev an enterprise-ready AI coding agent. This tool is designed to transform the software development workflow by integrating seamlessly with the tools developers already use. In this blog post, we will explore how Rovo Dev works inside your integrated development environment (IDE), why this integration matters, and how to get it set up. We’ll also cover important considerations like access permissions and usage limits, plus key lessons learned along the way that help ensure a smooth developer experience.
Rovo Dev: Atlassian’s Enterprise AI Coding Agent
Rovo Dev is Atlassian’s AI-driven coding assistant for the enterprise. It leverages artificial intelligence to accelerate and improve various stages of software development. From the moment a developer picks up a Jira work item, through writing and reviewing code, to creating pull requests and running CI/CD pipelines, Rovo Dev is there to help streamline the process. This agent achieves state-of-the-art results on industry benchmarks for instance, it reached a 41.98% resolve rate across 2,294 tasks on the SWE-bench Full benchmark, outperforming the next best coding agent by a large margin. In essence, Rovo Dev represents the cutting edge of AI assistance in programming, aimed at boosting both productivity and code quality in real-world projects.
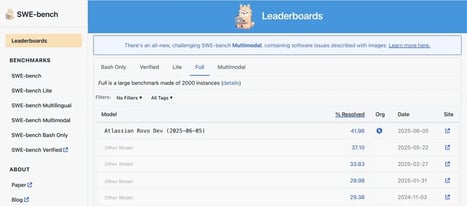
Key capabilities of Rovo Dev include:
-
Code Understanding & Navigation: It can instantly analyze your codebase, generate documentation, and explain code in plain language. This means you can quickly get insights or summaries of unfamiliar code without leaving your editor.
-
Development Acceleration: Rovo Dev assists with writing and refining code. It offers AI-powered code completion, suggests intelligent refactoring, writes automated tests, and even helps with interactive debugging. These features speed up development tasks and reduce manual effort.
-
Atlassian Ecosystem Integration: Because it’s built by Atlassian, Rovo Dev connects directly with tools like Jira, Confluence, and Bitbucket. For example, it can pull context from a linked Jira issue, incorporate information from Confluence documentation, or navigate to relevant Bitbucket repository files all to provide better answers and code suggestions in context.
-
Security & Administration: Rovo Dev is designed for enterprise use, so it includes robust security controls. Administrators have fine-grained permission settings and user management capabilities, ensuring that the AI agent only accesses what it’s supposed to. All data and code stay within approved boundaries, addressing the security needs of large organizations.
Why Integrate Rovo Dev with Your IDE
One of the core principles for developer tools is to meet developers where they already spend their time. Developers typically do the bulk of their work inside an IDE (Integrated Development Environment). Context-switching between the IDE and external tools can disrupt focus and productivity. That’s why Atlassian integrated Rovo Dev directly into the IDE. By bringing the AI assistant into the coding workspace, developers get on-demand help without breaking their flow. Here are the key benefits of using Rovo Dev within your IDE:
-
Staying in the flow: You can invoke Rovo Dev’s capabilities without leaving your code editor. This keeps you “in the zone,” since you’re not bouncing between different applications. The result is less distraction and more continuous focus on the task at hand.
-
Contextual awareness: Rovo Dev is aware of the context of your work. It knows which file you’re working on or which lines you have selected, and it can tailor its responses based on that. For example, if you ask a question or need a code suggestion, Rovo Dev can take into account the function or module currently open in your editor.
-
Easy context addition: Need to clarify something or provide more info to Rovo Dev? In an IDE integration, it’s simple to add context. You can quickly select a block of code or open a file, and Rovo Dev will include that in understanding your query. This makes interactions with the AI more precise and relevant to your current work.
-
Seamless diff viewing: When Rovo Dev suggests code changes, those changes can be displayed using the IDE’s built-in diff viewer. You get to review AI-generated modifications side by side with your original code in the familiar interface you use for normal code reviews. This helps in evaluating and accepting changes with confidence.
-
Workflow integration: An IDE integration means Rovo Dev can work alongside other developer tools and extensions you have. It can respect your editor’s settings, play nicely with linters or testing frameworks, and generally fit into your existing development workflow. This cohesion ensures that adopting Rovo Dev doesn’t mean disrupting other parts of your toolchain.
Given these advantages, Atlassian has made Rovo Dev’s integration available for popular coding environments. Currently, Rovo Dev is supported in Visual Studio Code (the integration is provided through Atlassian’s official VS Code extension). This support also extends to VS Code derivative editors, such as Cursor and Windsurf, so teams using those can also take advantage of Rovo Dev within their preferred IDE. With the groundwork laid out, let’s look at how you can get Rovo Dev up and running in your IDE.
Setting Up Rovo Dev in the IDE
Getting started with Rovo Dev in your IDE involves a few steps to configure access and launch the service. The good news is that Atlassian’s VS Code extension automates some of the heavy lifting Below is an overview of what you’ll need to do to start using Rovo Dev within Visual Studio Code or a compatible editor:
-
Install the Atlassian extension (with Rovo Dev support): First, make sure you have the Atlassian VS Code extension installed from the marketplace. This extension is the bridge that connects your editor to Rovo Dev. It will also automatically detect if the Rovo Dev CLI binary is missing or outdated on your machine and download the latest version for you. In most cases, you won’t have to manually install the Rovo Dev program the extension manages it in the background.
-
Gather your Atlassian credentials: Rovo Dev requires authentication to access Atlassian resources on your behalf. You’ll need to provide your Atlassian user email and an API token associated with your account. If you don’t already have an API token, you can create one by visiting your Atlassian account’s security settings and generating a new token. The extension will prompt you for these credentials when setting up Rovo Dev.
-
Specify your Atlassian site URL: Next, identify which Atlassian site (instance) you want Rovo Dev to work with. This is typically the base URL of your Jira Cloud site. For example, if one of your Jira issues is located at
https://mysite.atlassian.net/browse/PROJ-1, then your site URL ismysite.atlassian.net. Entering the correct site is important because Rovo Dev will check this site for your entitlements and will attribute any usage to this site. If you have access to multiple Jira sites, make sure to choose one that has Rovo Dev enabled for your account. -
Provide an experience ID (XID): An XID is a unique identifier for your Rovo Dev usage session or integration experience. It’s essentially a tag that helps Atlassian track how Rovo Dev is being used and prevent abuse. It also lets your organization’s admins see where Rovo Dev credits are being consumed. The XID is usually a short string in a reverse domain name format (for example,
com.yourcompany.projectorcom.example.rovodev.use_case). If you’re just testing, you can make up a descriptive XID for your session. The Atlassian extension may supply a default XID value, but it’s good to be aware of this parameter in case you need to set or recognize it. -
Choose a working directory for Rovo Dev: Rovo Dev runs in the context of a directory on your machine. In practice, you should navigate to the root folder of the project or code repository you want Rovo Dev to work on. That directory will contain all the source code and context that Rovo Dev needs to analyze in order to help you. Having the right working directory ensures the AI has access to the relevant files for your project.
-
Launch the Rovo Dev server: With everything set up, the next step is to actually start Rovo Dev in “serve” mode. The Atlassian extension will typically handle this when you initiate a Rovo Dev action, but you can also run it manually if needed. Under the hood, the command looks something like:
USER_API_TOKEN=<your_api_token> \
USER_EMAIL=<your_email_address> \
rovodev serve <port_number> \
--xid <your_experience_id> \
--site-url <your_site_url>
This command (executed in your project directory) starts the Rovo Dev service on a specified port, using your credentials, site, and XID. In most cases, you won’t need to type this out by hand the extension will run a similar command for you. It’s useful, however, to know that this is happening in the background. If you ever run Rovo Dev without the extension (say, via the command-line interface), these are the parameters you’d include.
-
Verify via API docs (optional): Once Rovo Dev is running (the extension will indicate it’s active), you can verify its status or explore its capabilities through the automatically generated API documentation. By default, the service hosts an OpenAPI/Swagger UI at
http://localhost:<port_number>/docs. You can open that in a browser to see all available API endpoints and test that the server is up. This is mostly a developer curiosity and troubleshooting step it shows that Rovo Dev is live and ready to receive requests from your IDE.
After completing these steps, Rovo Dev should be up and running inside your IDE. You’ll be able to interact with it through the Atlassian extension’s interface. Now, with the setup done, let’s talk about some important runtime aspects: ensuring you have access rights, handling any permission prompts, and understanding usage limits.
Entitlements: Checking Your Access to Rovo Dev
Even after you’ve installed everything correctly, Rovo Dev will only function if your Atlassian site (the one you entered during setup) has the proper entitlements. Entitlements in this context means your organization’s subscription or license includes access to the Rovo Dev feature. When Rovo Dev starts up, it performs a health check to verify that your user account on the specified site is allowed to use the service. If that check fails (for instance, if your site isn’t licensed for Rovo Dev), the Rovo Dev process will remain in a restricted state. In practical terms, you’ll see an error or status indicating “entitlement check failed.” During this state, Rovo Dev won’t process any requests or commands effectively all its functionalities are disabled except for a basic health-check and the ability to shut down. If you encounter this scenario, the next steps are to either switch to a different Atlassian site where you do have Rovo Dev access, or reach out to your site administrator to enable Rovo Dev for your current site. Essentially, this entitlement step ensures that only authorized users on paid/licensed sites can consume Rovo Dev’s services.
Permission Requests in the IDE
Running an AI coding agent like Rovo Dev can sometimes involve executing tasks that interact with your development environment or system. For example, Rovo Dev might need to run a shell command, modify a file, or perform some analysis that goes beyond just reading code. Understandably, developers and organizations want to control such actions for security reasons. Permissions are built-in safeguards within Rovo Dev’s IDE integration that require user approval for sensitive operations. When Rovo Dev is about to perform something potentially risky say opening a terminal command or making a major code change it will pause and ask for your confirmation. The Atlassian VS Code extension will typically show a pop-up modal or notification explaining what Rovo Dev wants to do, and you’ll have the choice to allow or decline the action. This ensures you’re never caught off guard by the AI executing something you didn’t expect.
For power users who find these prompts too repetitive, there is a configuration often referred to as “yolo mode.” In this mode, Rovo Dev will proceed with actions without asking for explicit permission each time. This can reduce friction if you’re comfortable with the AI’s level of access, but it should be used cautiously in environments where you fully trust the code and the tool. By default, though, the conservative approach is taken Rovo Dev will always err on the side of safety and ask you before doing something outside the scope of reading and suggesting code. As you continue to use the tool, you can adjust these permission settings to strike the right balance between security and convenience for your workflow.
Staying Within Usage Limits
Like many AI-driven services, Rovo Dev’s usage is governed by a quota or credit system. Your organization likely allocates a certain number of Rovo Dev credits per user or per site, depending on the licensing. As you use Rovo Dev to analyze code or generate solutions, you consume these credits. It’s important to be aware of usage limits so you’re not caught off guard in the middle of a coding session. If you happen to hit your usage limit, Rovo Dev will respond with an error indicating that you’ve run out of credits (or that usage is capped). In the IDE, the Atlassian extension will usually surface a clear message about this for example, a notification might inform you that you’ve used all your Rovo Dev allowance for the period.
When you reach a usage cap, your options are somewhat limited until the quota resets or is increased. You could contact your administrator to request additional Rovo Dev credits or an upgraded plan. Alternatively, if you have access to another Atlassian site where you still have credits available, you could switch the tool to use that site. In any case, Rovo Dev is designed to handle this gracefully: it won’t suddenly stop without explanation. The clear error messages about credit usage help you understand why the AI agent became unavailable, so you can take appropriate action.
Lessons Learned from Rovo Dev’s IDE Integration
The journey of bringing Rovo Dev into the IDE taught Atlassian’s engineering team several valuable lessons. By understanding these insights, you can better appreciate the design of the tool and avoid common pitfalls in your own implementation. Here are some key learnings from the development of Rovo Dev’s IDE integration:
-
Discoverable authentication: In early versions of Rovo Dev, the authentication step wasn’t very obvious in the UI. Many users had trouble figuring out how to log in or where to create an API token, which slowed adoption. The lesson learned was to make the sign-in process highly visible and straightforward. Clear calls-to-action, guided prompts, and direct links to Atlassian’s token generation page all help new users get started quickly. If you’re deploying a tool like this, ensure the first-time user experience makes authentication easy to find and understand.
-
Eager initialization for speed: Rovo Dev can take some time to download necessary files and start up its local server, especially on first use. Initially, users had to wait through a download and a startup delay when they tried to invoke the AI, which disrupted the experience. To fix this, the team implemented eager initialization essentially, the extension begins downloading and launching Rovo Dev in the background as early as possible (for instance, when you open your IDE or a relevant project) instead of waiting for the user’s first query. By parallelizing the startup with other user actions, Rovo Dev is often ready by the time the developer actually needs it. The takeaway is that performing heavy initialization tasks preemptively can make an AI tool feel much more responsive and integrated into the workflow.
-
Clear error messages: While using Rovo Dev, a user might run into issues around authentication, directory setup, permissions, or usage limits (as we discussed above). If the error messages for these situations are hidden or cryptic, users can become frustrated or stuck. Atlassian’s team found it crucial to present clear, descriptive error notifications in the IDE. For example, if the API token is incorrect, the extension should explicitly say so, or if Rovo Dev isn’t running in the right directory, it should prompt the user accordingly. By making errors self-explanatory, users can quickly correct the problem and continue using the tool without raising support tickets. In any development of an AI assistant, investing in good error handling and messaging greatly improves the user experience.
-
Managing multiple instances: Some developers like to multitask and will have several IDE windows or instances open for different projects. This posed a challenge for Rovo Dev, as it effectively meant running multiple instances of the AI assistant concurrently. The straightforward approach is to launch one Rovo Dev process per IDE instance, but that raises issues of resource usage and port conflicts. Atlassian addressed this by having the extension intelligently track and manage Rovo Dev instances. Each running instance is associated with the directory it serves and is started on a different port. The extension checks for available network ports and keeps track of process IDs, so if you close an IDE window, it can clean up the corresponding Rovo Dev process. This ensures that multiple Rovo Dev instances don’t step on each other’s toes, and resources are freed when no longer needed. The broader lesson here is about scalability and cleanup: if your environment might spawn multiple AI agent processes, implement a strategy to isolate them and prevent orphan processes or port collisions.
Integrating an AI coding agent like Rovo Dev into the IDE has clearly been a learning process, but these improvements have made the tool more robust and developer-friendly. As a result, developers can confidently use Rovo Dev to boost their productivity without worrying about setup hassles or confusing behavior.
Read next.
Non-Human Identities in Atlassian Cloud: Service Accounts, Tokens, Apps, and Agents
How to govern non-human identities in Atlassian Cloud: service accounts, API tokens, Forge apps, and Rovo agents, each with an owner, scope, and expiry.
October 1, 2026How to Choose an Atlassian Partner for a Jira Cloud Migration
How to choose an Atlassian Solution Partner for a Jira Cloud migration: what to verify, eight questions to ask, red flags, and a shortlist scorecard.
September 30, 2026The Complete Guide to Agent Readiness in Atlassian Cloud
Agent readiness for Atlassian Cloud: the five checks to run before you switch on Rovo agents, from identities and permissions to the off switch.
September 28, 2026How to Review Rovo Agent Access in Jira and Confluence
A step-by-step access review for Rovo agents in Jira and Confluence: who can create them, who can use them, what they can change, and what gets logged.
The blog, weekly.
One email a week with what we published. No drip sequence, and you can leave in a click.