

Importing HTML into Confluence: A 2025 Tool Review
Confluence's HTML importer, under Spaces > Import from other tools > HTML, turns a ZIP of .html files into pages, keeping headings, formatting, links, tables, lists and images stored in a folder named after each page. It is still in beta, and other attachments, page hierarchy and custom text colors do not come across, so plan to add attachments and arrange pages by hand.

In this article, we will explore one of the most commonly used methods for importing data into Confluence: HTML. Our goal is to assess the reliability and capability of the importing tool. To thoroughly evaluate its performance and final results, we selected an existing article as a test case. This article features a variety of elements, including tables, bullet lists, images, headers, bold and italicized text, centered text, subpages, and more.
How does the page looks?
We have created an html article about Cars in general
Main Page:
First page includes headers, bold and cursive text, hyperlinks that lead to childpages and an attachment
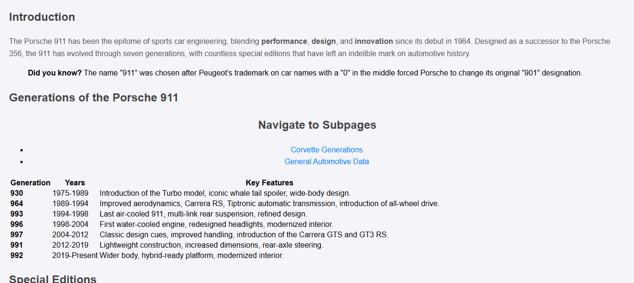

Sub page 1
Now in the page number 2 we have included images, lines, tables, bold letters.
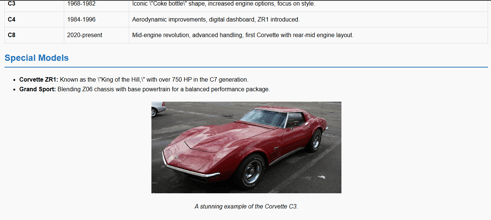
Sub page 3
Features more images and texts
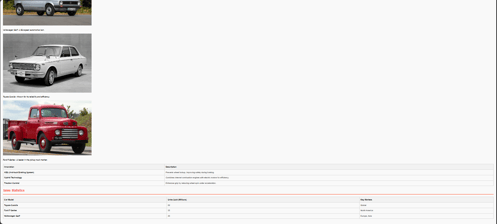
Its worth to highlight that we’ve customized the images so they all have the same size.
How to perform the Migration?
-
First thing to put an eye on is the HTML document that you want to import into confluence
-
Make sure you have all the images and attachments correctly stored.
-
Have the ZIP file compressed.
-
Now in confluence upload the HTML and wait for the migration to be done (usually you’ll be notified by email)
Spaces>Import from other tools>HTML import.
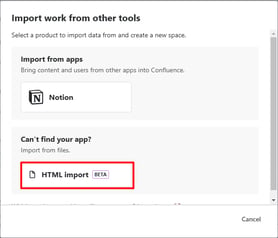
Coding
|
Feature |
HTML Coding |
Tag definition |
Code Explanation |
|---|---|---|---|
|
Titles |
The Page’s titles are not a part of the code, as they acquire the name of the file |
There are no tags or terminology needed to explain |
Each page intended for export has its own code file, with each file named accordingly to distinguish it |
|
Letters |
<h2>Introduction</h2>
|
<h2> is used to insert a header of size 2, the greater the number the bigger the letter <p> defines a paragraph <strong> is used for important text, always has bold lettering <blockquote> is used to insert a block of text |
We first define our header and its size, followed by adding a paragraph. Within the paragraph, any word we want to highlight must be enclosed within the <strong>...</strong> tags. |
|
Links |
<nav>
|
<nav> defines a set of navigation links <ul> defines an unordered list <li> list item <a> defines a hyperlink href=specifies the URL of the page the link goes to |
as we are about to include some internal links we first have to call the first function “nav”, then, to insert the hyperlink we would write “a” to indicate we are calling a hyperlink. As we want the links to be displayed as a list for every URL that we put, it is necessary to put each of those inside a different <li>…. </li> |
|
Images |
<img src="images/vw_golf.jpg" alt="Volkswagen Golf" width="720" height="auto"> |
<img src> specifies the path to the image width= specifies the width of the image “auto” specifies that the height of the image will be calculated automatically based on the width alt= specifies a set of text that would pop up if the image does not displays |
As we want to put an image first thing to do is tell the system were our image is located, for that we call the function “img src”, after that we define the desired width and height |
|
Tables |
<table>
|
<table> used to insert a table <thead> define a header for the table <tr> specifies a row for the table <th> defines a header cell <tbody> specifies the body of the table <td> standard data cell |
First we call the Table function, then we declare we are going to put the headers ”thead” in a new row “tr” every header goes inside a <th>……</th> Next, we need to add the body segment of the table. Remember, we use the <td> tag to insert general data. |
|
Colored text and font |
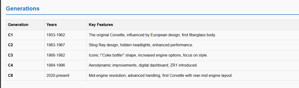
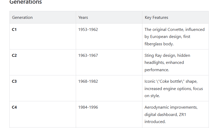
<title>Legendary Cars: Corvette Series</title>
|
font-family defines the font that is meant to be used margin: sets the margin padding: sets the padding of the text color: sets the color of the text |
First, we add our title. Then, we use the style attribute to customize the text, specifying the font-family to define the font type, as well as setting the margin and padding (in pixels) |
|
Information |
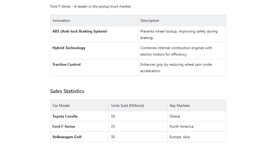
<tbody>
|
<tbody> specifies the body of the table <tr> specifies a row for the table <strong> is used for important text, always has bold lettering |
In this section, we are evaluating the content. First, we created a table with a <tbody> element, then added bold text using <strong>ABS...</strong>, and finally closed the table body with </tbody> |
|
Lettering |
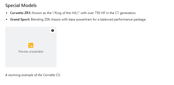
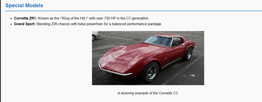
<p><em>A stunning example of the Corvette C3.</em></p> |
<p> defines a paragraph <em> is used to defined emphasized text, usually displayed in italic. |
When writing simple text, the first step is to declare it as a paragraph. To stylize the text and italicize it, we use the <em>...</em> tag. |
|
Bullet list |
<ul>
|
<ul> defines an unordered list <li> list item |
When creating a bullet list, the first step is to use the <ul> tag for an unordered list. Then, each bullet point must be enclosed within the <li>...</li> tags. |
|
Attachments |
<h2>Attachments</h2>
|
<h2> is used to insert a header of size 2, the greater the number the bigger the letter <ul> defines an unordered list <li> tag defines a list item <a> defines a hyperlink href=specifies the URL of the page the link goes to |
When adding attachments in HTML, we place the text inside a bullet point using the <ul> and <li> tags. Since we are creating a hyperlink, the <a> tag is required. Finally, to specify the file's path, we use the href attribute followed by the file path. |
Image Comparisons
Evaluating and comparing the results between the original file and the new one is crucial when assessing the success of it.
|
Feature |
HTML |
Confluence |
|---|---|---|
|
Titles were migrated correctly. |

|
|
|
Letters were migrated correctly as they maintain the same format. |
|

|
|
Links function correctly, either internal or external links. |

|

|
|
Images were not migrated. |
|
|
|
Tables were migrated correctly. |
|
|
|
Colored texts were not correctly migrated. |

|
|
|
Information was correctly migrated. |
|
|
|
Lettering was correctly migrated. |
|
|
|
Bullet list was correctly migrated. |
|

|
|
Attachments were not correctly migrated. |
|
|









Recommendations.
-
Confluence always requires a compressed ZIP file for uploads. It is recommended to organize images and attachments into separate folders within the ZIP file.
-
If the HTML importing tool reports that the file is broken, unreadable, or encounters other issues, it could be due to an existing instance in Confluence causing conflicts. To avoid this, it is recommended to clear the instance in Confluence before performing the migration.
-
As of January 2025, the importing tool is still in its Beta stage, which means some features are not functioning as expected, for instance, the images and attachments importer. We tested the same file in Notion to compare outcomes, and all images and attachments were migrated flawlessly. We are confident that these features, and possibly more, will be supported in the future. However, at the time of testing, the importer was not a reliable or usable feature.
-
Confluence always requires a compressed ZIP file for uploads. It is recommended to organize images and attachments into separate folders within the ZIP file.
Conclusion.
The migration process from HTML to Confluence offers a unique opportunity to enhance content organization and collaboration. While the current importing tool is still in its Beta stage and presents some challenges, particularly with handling images and attachments, it also demonstrates Confluence's potential as a powerful content management platform.
Through our testing, we found that:
-
The importer is usable today for text-heavy pages, within limits. Atlassian still describes it as beta, and its current documentation lists headings, text formatting, links, tables, lists and images among what it preserves, provided the zip holds one folder of .html files and each page's images sit in a folder with the same name as the page. Attachments other than images and the page hierarchy do not come across, and custom text colors do not carry over as colors, so plan to add attachments and arrange pages by hand after the import.
-
Alternative approaches, such as organizing assets into separate folders or leveraging Confluence’s native attachment features, can streamline the migration and deliver excellent results.
As the importing tool continues to evolve, we are confident that future migrations will be even smoother, allowing for an even better user experience. With the right preparation, migrating from HTML to Confluence is not only feasible but can also significantly enhance content accessibility and collaboration.
Read next.
Change Management in Jira Service Management: A Guide
See how to manage organizational change effectively with Jira Service Management, using proven strategies for lasting adoption across teams
April 16, 2026New Work Types in Jira Business Spaces
Learn how Jira's new work type hierarchy in business spaces gives non-technical teams better structure, and control over their work.
April 16, 2026Web Search in Rovo Agents: What It Is and How to Use It
See how web search in Rovo Agents works, how to set it up, and how teams are using it to bring live web context into their workflows.
April 13, 2026Real-Time Use Cases of Rovo AI in Jira and JSM
See how Atlassian Rovo is changing the way teams work in Jira and JSM in real time.
The blog, weekly.
One email a week with what we published. No drip sequence, and you can leave in a click.